 en
en
Using ARK Survival Evolved server hosting, you will have more control, customization options, and a shared environment with other explorers and friends. We'll walk you through the process of how to make your own Godlike-powered ARK server in this tutorial.
Step 1: Registering on Godlike.Host
Go to the Godlike.Host website and register for an account first. Enter your information, pick a secure password, and confirm your email address. This step is essential because it will provide you access to the capabilities and tools required to configure and run your ARK server. [Not for Xbox]

Step 2: Choosing Your ARK Server
Plan Once you're logged in, explore the various ARK server plans available. Select the one that suits your needs in terms of player slots, server location, and performance. Godlike.Host offers a range of options to accommodate different gameplay preferences.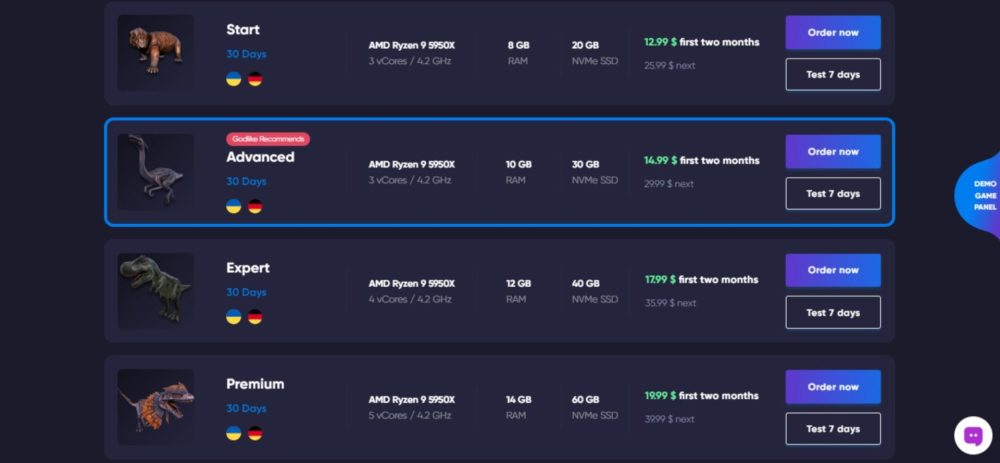
Step 3: Configuring Your Server
It's time to adjust your server settings after selecting your plan. You will have control over a variety of elements, such as player limitations, game settings, and modifications. You may customize these parameters using Godlike.Host's user-friendly interface to suit your tastes. 
Step 4: Installing Mods (Optional)
Enhance your ARK experience by adding mods to your server. Godlike.Host makes it easy to install and manage mods with their integrated mod manager. Choose from a wide selection of mods to customize gameplay, add new features, or even change the game's dynamics.
Step 5: Inviting Players
It's time to invite your friends or other people to join the adventure now that your server is set up. Share the server information, if applicable, including the server name and password. When you build a group of gamers that share your interests, this is when running your own server truly shines. 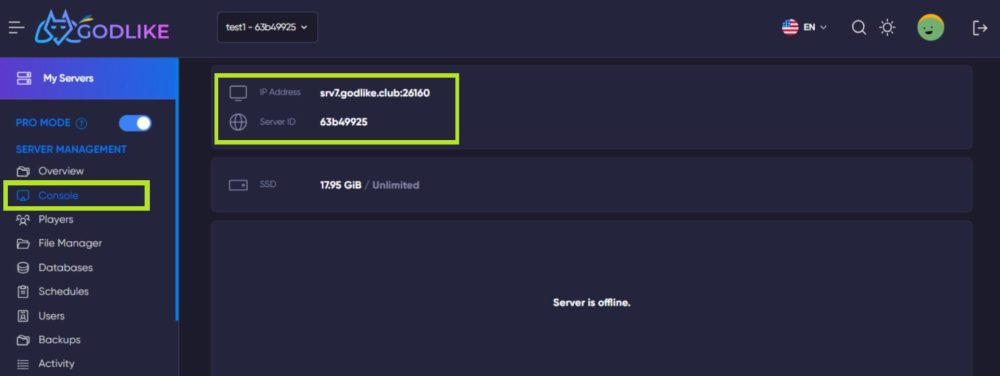
Step 6: Managing Your Server
As the server admin, you have the power to manage and monitor your ARK world. Godlike.Host provides tools to help you keep an eye on player activity, apply updates, and troubleshoot any issues that may arise. Regular maintenance ensures a smooth and enjoyable experience for everyone.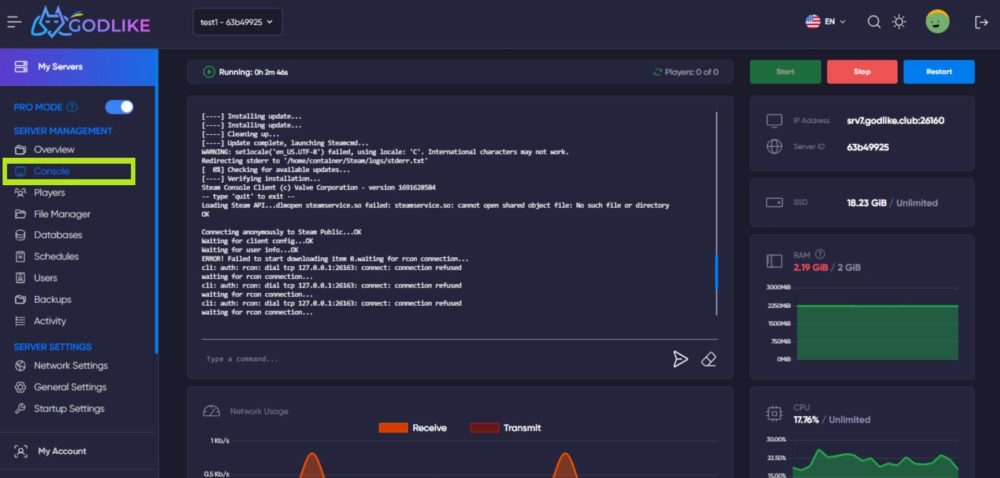
Using Godlike to build your own ARK server provides up several opportunities. Hosting a server provides you the flexibility to customize your ARK experience, whether you want to create a community of explorers or just enjoy a private world with friends. You'll be well on your way to designing a virtual paradise that suits your preferences if you stick to these easy steps. Create the ARK world of your dreams by setting off on your quest right now!