
 en
en
 CHAT WITH GODLIKE TEAM


How to upload your world to the Minecraft server (Java and Bedrock)
- 5 min read
- 1102
- 1
Using Your Existing Minecraft World on a Server
If you already have a custom Minecraft world from singleplayer, a download, a friend, or a previous server, you can use it as the world for your new server by uploading and setting it up properly.
This guide explains how to upload and configure a custom world for both Java Edition and Bedrock Edition servers.
IMPORTANT
For best results, use a world created in the same Minecraft version as your server. Worlds from other versions may cause chunk errors, missing blocks, or corrupted data.
Before uploading, it’s a good idea to create a backup of your current world, in case you ever want to roll back the server or if something goes wrong.
Uploading and Configuring a Custom World (Java Edition)
For this guide, we will upload a custom world using the Godlike Panel.
Step 1: You can upload your world folder by opening the Files section in the Godlike Panel or by connecting to your server via SFTP.
TIP
If you need help connecting via SFTP, follow this two-step SFTP connection guide.
Step 2: Select your desired world folder.
If your world is in a .zip file, make sure to extract it before uploading, or unzip it directly in the panel after the upload, the folder must be fully unpacked before use.
Step 3: Set your uploaded world as the main server world.
- Open the Config tab in the Godlike Panel while your server is stopped.
- In the Server Properties section, find the level-name field - it specifies which world folder the server loads.
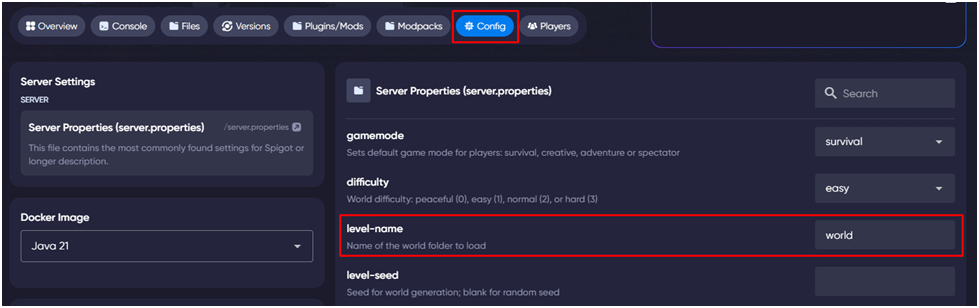
- By default, this value is set to world. Replace it with the exact name of your uploaded world folder.
Example:- level-name=MyCustomWorld
- Save the changes and start your server.
You can also edit this manually in the `server.properties` file under the Files tab if you prefer.
IMPORTANT
If your uploaded world was created using mods, plugins, or custom server software (for example Forge, Fabric, or Spigot), you must install the same modifications or plugins on your server.
If those mods or plugins are missing, the server may fail to start, or the world may load with missing blocks, entities, or cause chunk corruption.
Once it’s fully loaded, join the server to confirm that your uploaded world has loaded correctly.
Uploading and Configuring a Custom World (Bedrock Edition)
If you have a custom Bedrock world from singleplayer, a download, or another server, you can upload and use it as your main server world through the Godlike Panel.
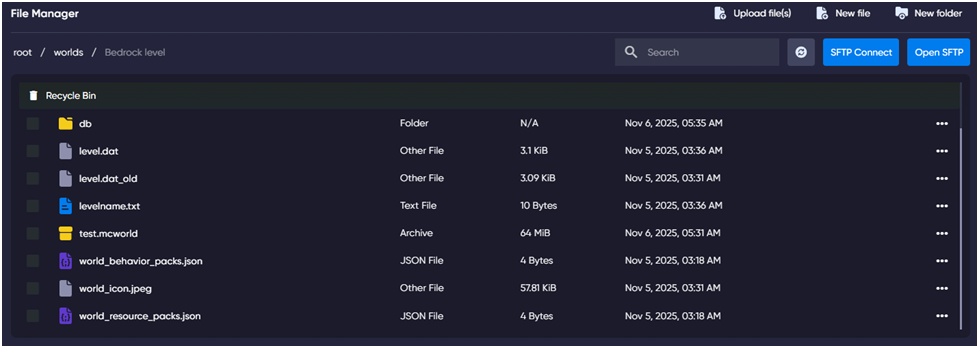
Bedrock worlds differ from Java worlds, they contain files such as level.dat and subfolders like db, behavior_packs, and resource_packs inside the main world folder.
Step 1: You can upload your Bedrock world by opening the Files section in the Godlike Panel or by connecting to your server via SFTP.
TIP
If you need help connecting via SFTP, follow this two-step SFTP connection guide.
Step 2: Access your server’s Files tab and open the worlds folder. Upload your .mcworld file into this directory.
NOTE
Bedrock worlds are usually found in your local Minecraft folder under /games/com.mojang/minecraftWorlds/.
Unlike Java worlds, they include files like level.dat and folders such as db, behavior_packs, and resource_packs.
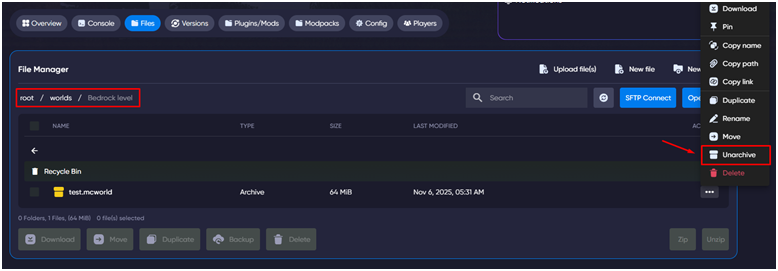
Step 3: After uploading your world, return to the Godlike Panel, open the Files tab, and navigate to root / worlds /.
Find your uploaded .mcworld file, click the three dots, and select Unarchive to extract it. Make sure the world files (level.dat, db, etc.) appear directly inside the folder and not within another subfolder.
Step 4: Set your uploaded world as the main server world.
- Open the Config tab in the Godlike Panel while your server is stopped.
- In the Server Properties section, find the level-name field - it specifies which world folder the server loads.
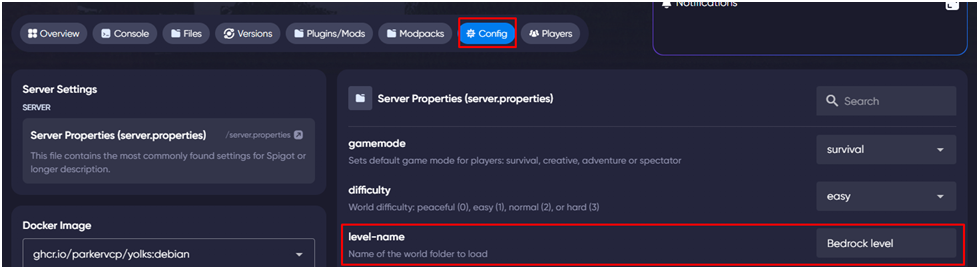
- By default, this value is set to Bedrock level. Replace it with the exact name of your uploaded world folder.
Example:- level-name=MyBedrockWorld
- Save the changes and start your server.
You can also edit this manually in the `server.properties` file under the Files tab if you prefer.
Once your server starts, join it to verify that your uploaded world has loaded successfully.
Thank you for reading our guide on how to upload your world to a Minecraft server.
We hope this tutorial helped you set up and enjoy your custom world on your Godlike Server.