


 en | USD
 ua
ua es
es de
de pl
pl fr
fr pt
pt it
it nl
nl hu
hu ro
ro sv
sv ja
ja nb
nb sk
sk
 CHAT WITH GODLIKE TEAM


 Our team
  Career
  About Support
  Contact Us
  About Us
 How to Install a Custom Modpack on a Minecraft Server
- 8 min read
- 120
- 0

Bring Your Own Mods: Installing a Custom Modpack on a Minecraft Server
Creating your own modpack lets you combine mods in any way you like, building a unique gameplay experience. However, such personalized packs rarely include server-ready files, so setting them up often requires a bit of extra work. If your collection includes many mods, prepare for a more involved installation process—organizing files, checking versions, and uploading everything correctly can take time.
This guide covers the full process of preparing and running your custom modpack server from start to finish, even if it’s your first time managing one.
TIP
How to Install a Custom Modpack on a Minecraft Server
TIP
If you want to use one step modpack installation you can check our modpaсk install guide
To upload and set up your custom modpack on a Minecraft server, follow these steps:
Step 1: Modpack Preparation
Before uploading your custom modpack to the server, launch it in single-player mode to make sure all mods load correctly and the game runs smoothly. This step helps you identify missing dependencies or version conflicts before they cause issues on the server.
Once the modpack works locally, verify that your server has enough RAM and CPU power to handle it. Large modpacks often require more resources-both for smooth performance and for preventing crashes during world generation. If you’re unsure about the requirements, check the total number of mods and consider allocating additional memory or upgrading to a higher server tier.
TIP
Some modpacks require a special launcher, such as CurseForge.
You’ll need to use it to install and run the modpack correctly.
You need to prepare all necessary files:
- Make sure you have:
- Mod files (.jar extension)
Optional (if available):
- Configuration files (config folder)
- Datapacks (.zip files)
- Resource packs (.zip files)
- Check version compatibility:
- The Minecraft version on the server must match the mod version (e.g., 1.20.1)
- If using Forge: make sure the Forge version on the server matches your mod version
- If using Fabric: make sure Fabric Loader and Fabric API are installed
Step 2. Installing the server version
Before transferring all the necessary files to the server, you need to install a clean Minecraft server with the required version.
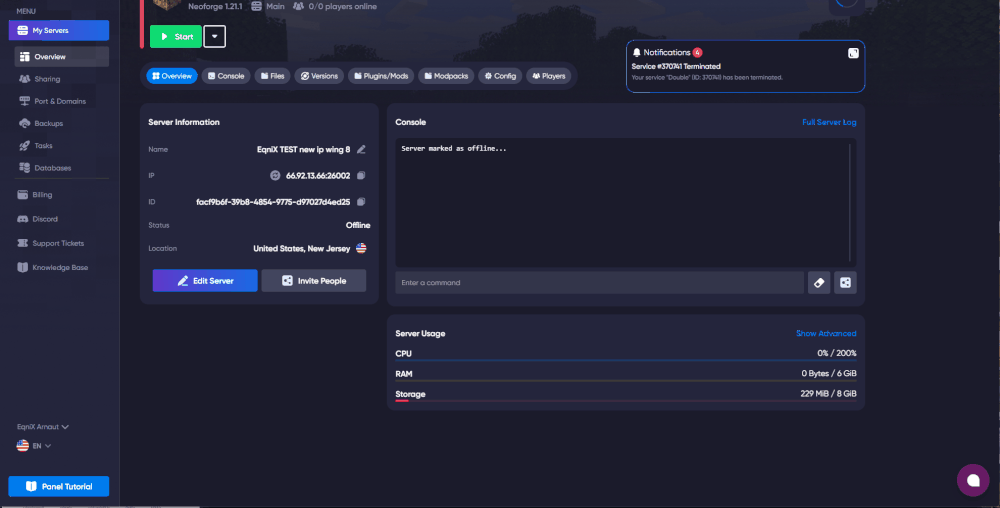
- Go to the server panel
- Click on the “Versions” tab
- Select the version you need and click “Install”
- Wait for the server to install and turn it on by clicking the “Start” button so that the server generates all the necessary folders and files.
- Once the server is running, stop it.
TIP
If you want to keep your files, don’t enable the “Vipe server files” checkbox.
The panel will update only the necessary files.
Step 3. Connecting to the Server via File Manager
There are two main ways to upload files to the server:
Method A: Via Godlike.Host Panel File Manager
- Log in to your server control panel
- Find the "Files" or "File Manager" section
- Click the "Upload" button and select files from your computer
- Wait for the upload to complete
Method B: Via SFTP Client (FileZilla, WinSCP)
1. Download and install an SFTP client (e.g., WinSCP)
2. Get connection credentials from Godlike.Host panel (host, port, username, password)
3. Connect to the server via SFTP
4. Drag files to the required folders (details below)
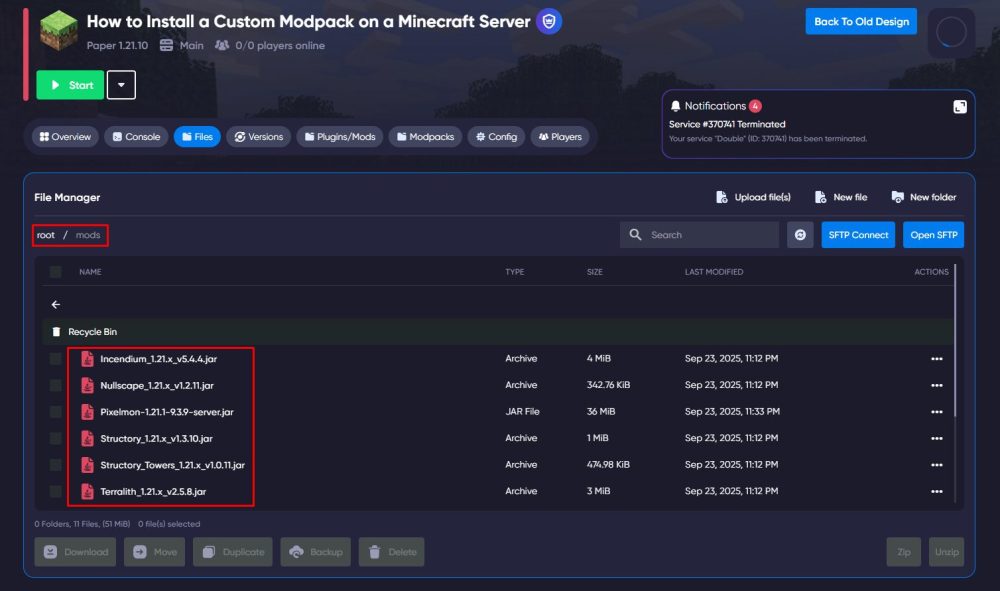
Step 4. Installing Files to the Correct Folders
It's very important to know where to install each file type:
/mods folder - for mods
- Copy all .jar mod files here
- Full path: /home/container/mods/
- Example: example-mod-1.20.1.jar
/config folder - for configurations
- Copy mod configuration files here (if they exist in your modpack)
- Full path: /root/config/
- Example: examplemod-config.toml

/world/datapacks folder - for datapacks
- Copy datapacks here (.zip files or unpacked folders)
- Full path: /root/world/datapacks/
- Example: custom-datapack.zip

Once your modpack is uploaded, you need to remove or disable any mods that are meant for client use only. These mods usually change visuals, interface, or camera behavior and will cause the server to crash if loaded.
How to Disable Them
Open your server’s /mods folder and rename each client-side mod file by adding .disabled to the end - for example:
modname.jar → modname.jar.disabled.
This keeps the file but prevents it from loading. To enable it again, remove the .disabled part.
How to Identify Client Mods
Mods that affect performance, graphics, or the user interface are typically client-only.
Mods that add items, blocks, mobs, or gameplay features should stay on the server.
If you’re unsure, check the mod’s description - most authors specify whether it needs to be installed on the server.
Step 5. Server Restart
- After uploading files, restart the server via the control panel
- Make sure all mods loaded and activated correctly (check server logs or console)
Step 6. Verifying Modpack Functionality
- Join the game and try to connect to the server
Launch Minecraft with the same modpack version and try to join your server.
If connection fails, make sure the Minecraft, Forge/Fabric, and mod versions match.
- Check the presence and functionality of all mods/plugins
Once in the game, verify that mods load correctly - new blocks, items, and features should appear without missing textures or errors.
If you use plugins (e.g. with Magma or Mohist), confirm they are active with /plugins.
- If errors occur — check messages in the server console/log files
Watch for errors or warnings in the server console or in logs/latest.log.
Lines marked with ERROR, FATAL,or Exception usually indicate which mod or plugin is causing issues.
Troubleshooting Common Errors
If there are still problems in the modpack, the server may crash with different errors.
Below you can find the most common issues and how to fix them.
If none of these help, contact our support team or check community forums for additional information.
Error: "Failed to start server"
- Check mod and Minecraft version compatibility
- Be sure to check that there are no client mods on the server.
- Make sure Forge/Fabric is correctly installed
- Review server logs for messages about missing dependencies or invalid distribution.
Error: "Mod won't load"
- Check if the .jar file is in the /mods folder
- Make sure the mod supports your Minecraft version
- Check for conflicts: some mods may not load because they are incompatible with other mods.
- If needed, try a different version of the mod or remove it temporarily.
Error: "Cannot connect to server"
- Check server status in the control panel
- Make sure the player has the same mods installed as on the server
- Restart both server and client after making changes to mods or versions.
- If connection fails, check for mod mismatch errors in the console or crash report.
Useful Tips
- Always create a backup before installing new mods
- Don't mix mods from different Minecraft versions
- If mods require additional configuration, follow their developers' instructions
- Regularly review console/log files (e.g., latest.log, crash reports) for warnings or errors even if server appears stable.
Additional configurations
When the server is running with your modpack, most mods will work automatically without extra steps.
Some features, however, may need manual setup - especially those that connect to external services or use additional ports and configuration files.
Here are some key areas to check:
- Simple Voice Chat - requires opening an additional port and adjusting its config file.
- GeyserMC - needs setup for Bedrock player access (IP, ports, authentication).
- Datapacks - must be placed in the correct folder and reloaded to apply changes.
- Mods with external connections - such as those using databases or API tokens (for example, DiscordSRV).
Always check the mod’s page or console messages - if setup is required, the mod author or error log will indicate what needs to be done.
TIP
That’s it - your server and modpack are ready to use. If you experience any problems or need help with setup, contact our support team.
