In the update 1.21 of Minecraft, Mojang listened to the community and added another dungeon to the game — Trial Chambers. So far and by many, considered to be the best dungeon in Minecraft due to it’s procedurally generated layouts(which mean that each dungeon is unique and provides fresh experience), interesting wave-based combat system and incredible amount of loot. Inside the walls of this underground copper dungeon, you will face waves of enemies that spawn from Trial Spawners and upon clearing the wave, you will likely receive a Trial Key, that will help you unlock Vaults and get the desired loot!

Make your own FREE minecraft server
MINECRAFT FREE SERVER
Whether you play alone or with a bunch of friends, Trial Chambers are the best dungeon-crawling experience in entirety of Minecraft. So, we’ve prepared for you a complete guide on how to find, gear up and loot trial chambers all in one article, let’s dive in!

What Are Trial Chambers in Minecraft?
Unlike most standard dungeons in Minecraft, such as abandoned mineshafts, jungle or desert temples, Trial Chambers are not just a place for looting — it’s a dedicated combat zone. They consist of corridors, large combat areas, traps and supply chests.
The core mechanic of the place revolves around Trial Spawners — unique to the dungeon spawner blocks, that spawn a limited number of mobs, based on how many players are nearby. Once the wave of mobs was cleared, you will receive a reward from the same very spawner.
Another thing that makes Trial Chambers unique, is the replayability. Once you clear the wave, the spawner goes on a 30-minute cooldown. However, after that period, you can come back to the same spawner and clear the wave of mobs again. This makes Trial Chambers wroth checking out even after the first initial exploration.

How to find Trial Chambers
Trial Chamber are generated deep underground, usually between the Y-level of -20 to - 40. So technically speaking, just randomly digging in all possible directions in the specified Y-level range may lead you to find Trial Chambers if you are lucky. Let’s be honestly though, it’s tedious, so here’s a better ways to do it:
- The Cartographer: Find a village. There, either find a cartographer or turn on of the villagers into one. Level it up to the Journeyman tier, which is indicated with a golden badge on the villager. Once done, there is a chance that the cartographer of this level will sell a Trial Explorer Map, which will lead straight to the Trial Chambers. If you didn’t get lucky the first time, not to worry, just find or turn another villager and try again.
- Caving: If you prefer a natural exploration over the maps, a good way to find Trial Chamber is to explore big cave systems that go down the the specified Y-level mentioned above. Be on a look out for exposed Copper or Tuff blocks, as they might be a part of the Trial Chamber’s room.
- Commands: If you have cheats enabled and want a quick way to find Trial Chambers, you can use the following command:
/locate structure trial_chambers . This command will give you the exact coordinates in the chat, by clicking on which you will automatically be teleported to the place.

When should you go to the Trial Chambers?
Despite having a lot of good loot, Trial Chambers also posses a lot of danger, as the loot cannot be obtained without encountering and fighting the mobs. Naturally, many players tend to ponder, whether they should go to the Trial Chambers early-game or late-game.
The answer however is not so simple, as it may highly depend on factors like player’s skill, amount of players, game difficulty etc. So, here are a few scenarios of when you can go to the Trial Chambers:
- Early-game: Highly risky, however, most beneficial in terms of loot. Keep in mind, that early-game, despite the name, still means that you have an iron gear already. So, while possible, this is a the scenario suitable for highly skilled players or big parties, as the amount of mobs, traps and different negative debuffs, can easily make it a big struggle.
- Mid-game: This scenario is the sweet spot for many player, as mid-game, with newly obtained diamond armor, clearing Trial Chambers is exactly the right balance of challenge and reward.
- Late-game: Standard Trial Chamber posses no threat to the late-game players with a netherite armor, and can be easily cleared. The loot is the same as before, but since the player is already advanced, it might not be of much use to them. However, once the standard Trial Chambers are cleared, the player can go for a more challenging version of it — Ominous Trials, with stronger enemies and better loot. These deadlier Ominous Trials are recommended to be taken on late-game with a good preparation. In some cases, you may try your strength in them at mid-game, but this will be a significant challenge.

What to bring: Trial Chamber preparation checklist
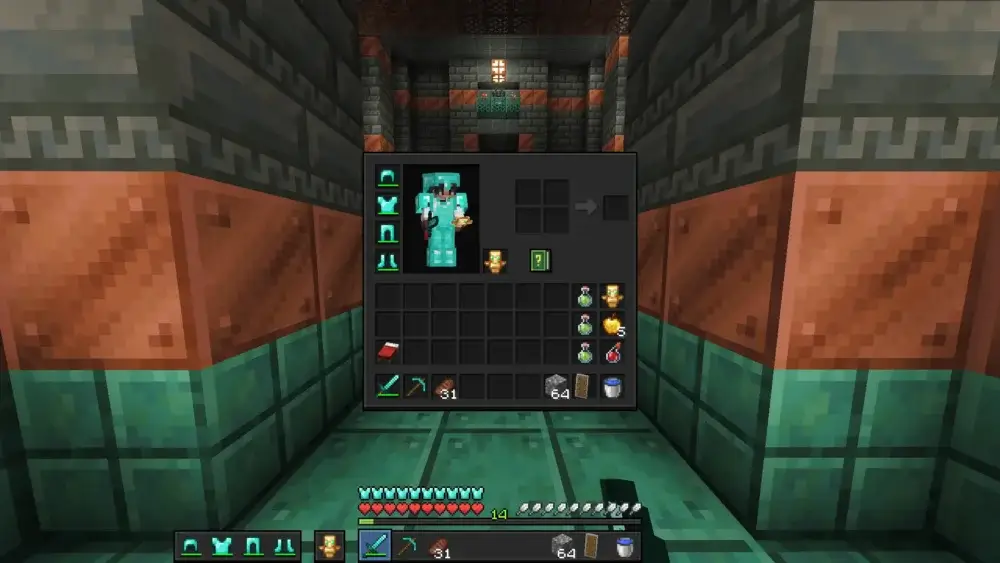
Since Trial Chambers are that much of a challenge, you should always come prepared. Here’s a full checklist of what you should prepare and bring to successfully take on the challenge:
- Armor: The bare minimum for Trial Chambers is iron armor, just like we mentioned in the early-game scenario. However, we strongly suggest getting at least diamond armor before taking on the challenge.
- Weapons: Strong, enchanted sword or axe are a perfect weapon for trial chambers. Bow / Crossbow can prove to be quite useful as well.
- Shield: Be sure to take a shield with yourself, two even, as there are lots of mobs and projectiles you would want to protect yourself from.
- Totem of Undying: If you already have it, 100% bring it with you alongside everything else
- Food: Be sure to stock up on food, as it is the main source of healing. Preferably the high-tier food like steaks, golden carrots etc.
- Blocks: You will need a way to barricade or escape quickly, so a few stacks of blocks are a necessity. Any blocks would do the trick.
- Torches / Night Vision Potion: While the dungeon has light sources inside, it can still get rather dark, so either bring along additional light sources like torches, or a few night vision potions for better visibility.
- Water bucket: Essential item that will be a big help, as it can help: land from high places with no damage(water bucket clutch), remove cobwebs, put out fires, push mobs back and much more.
- Healing: Additionally to food, make sure to bring a few healing potions, they can be a lifesaver in a crucial moment, especially if you don’t have totem of undying.
- Bed: Place the bed in a small, safe place near the Trial Chambers and right click on it to set a check point. Even if you die, at least you will be close to the dungeon, so you will have the chance to get your items back and continue the exploration.
Understanding Trial Spawners
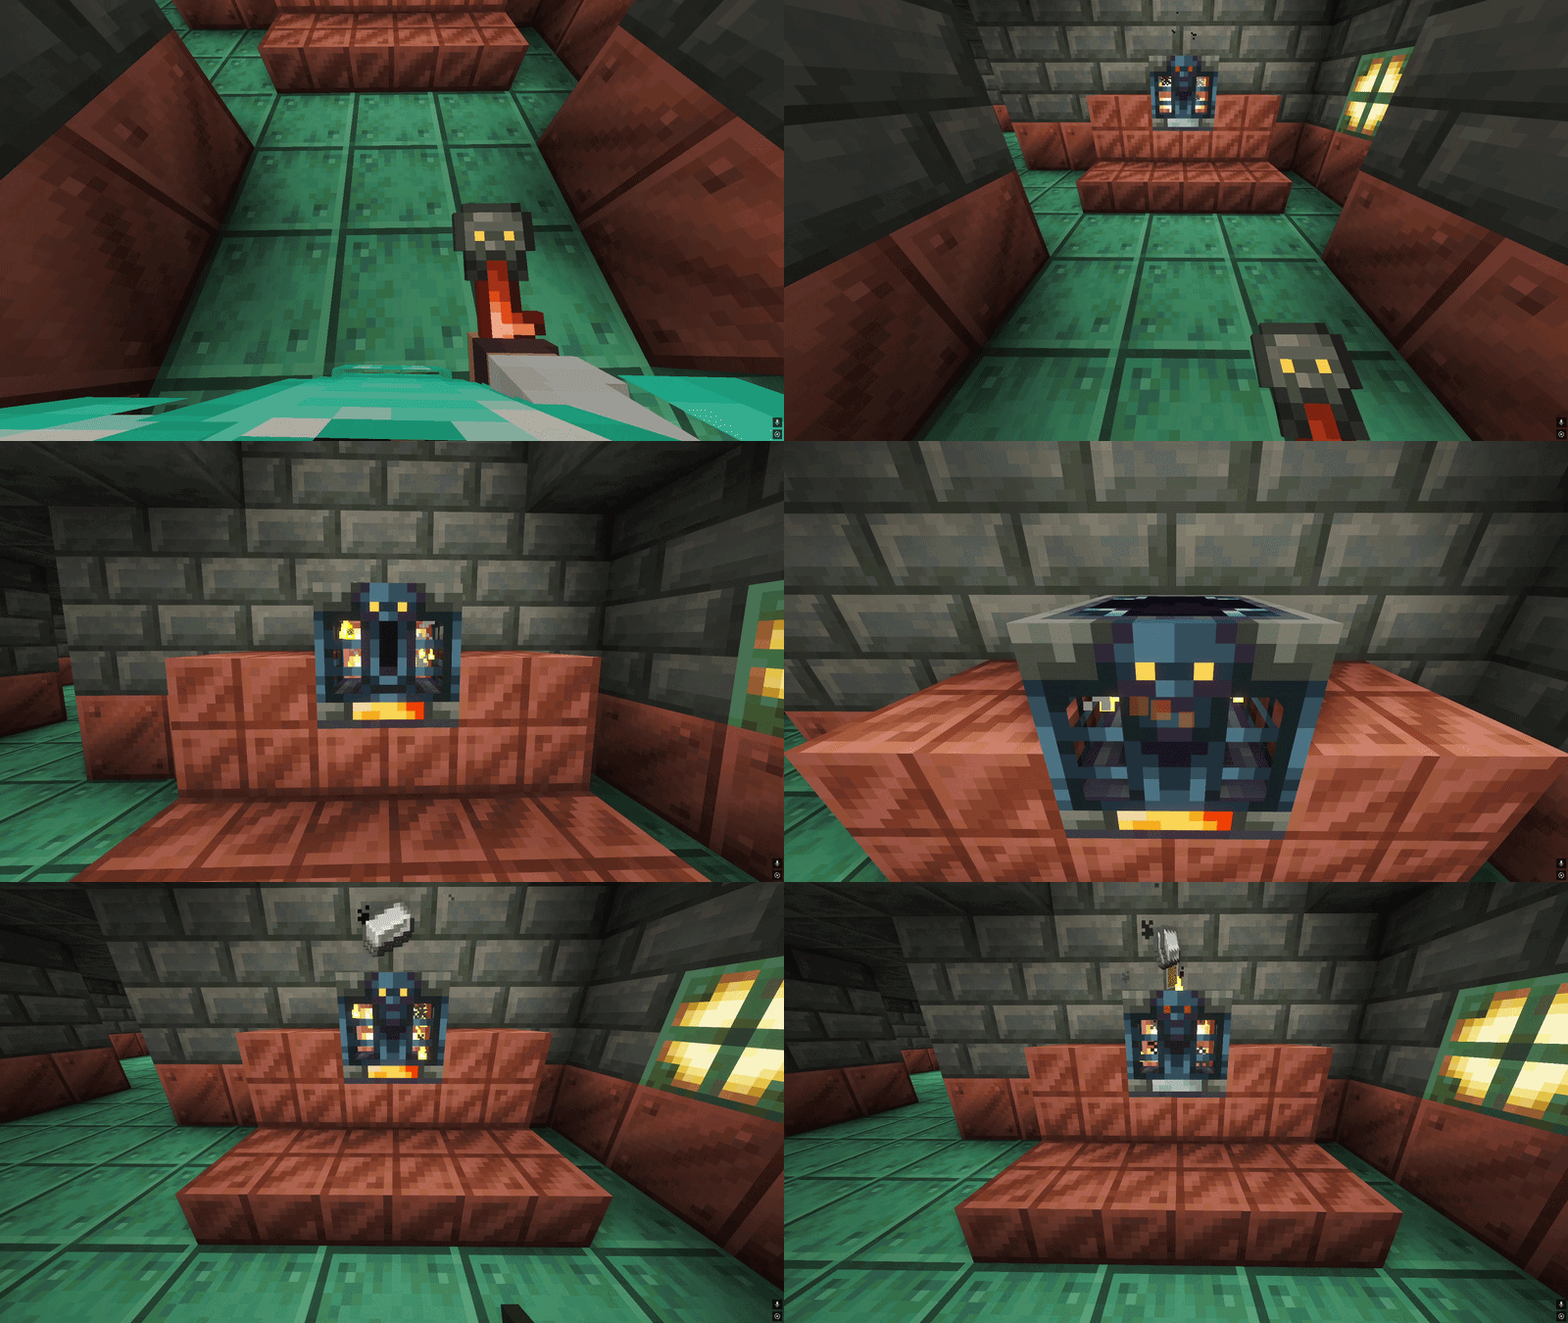
While Trial Spawners are essentially still just a spawners, they are different compared to the average zombie or skeleton spawners found in the caves, and here’s how:
- Line of Sight: Trial Spawner activate only when a player gets close and enters their line of sight.
- Player Scaling: The number of mobs spawned scales with the number of players in the room, more players — more mobs.
- Limited Waves: Trial Spawners cannot spawn mobs infinitely. Once you defeat the required number of mobs, the spawner is defeated and goes on cooldown.
- Rewards and Cooldown: Upon defeating the wave of mobs, the spawner ejects various loot: food, emeralds or a Trial Key. After that, it enters a 30-minute cooldown we mentioned earlier. You understand if the spawner is still on cooldown by the smoke particles. Until the cooldown has passed, the spawner won’t activate again.

Vaults and Trial Keys
As you defeat the wave of mobs that was summoned by the spawner, you will occasionally receive a Trial Key. Those are used to loot better rewards from the dungeon, as even though there is plenty of loot just lying around in the chests and pots, the best rewards are locked in the vaults and require this exact key to open them!
If you thought of breaking the rules, by somehow mining the vault, or blowing it up — don’t bother. These blocks are sturdy and secure, the only way to get your rewards is to bring the key and right click with it on the vault.
Vaults have a multiplayer bonus system: unlike normal chests with loot, they can be opened by multiple players and everyone gets their share of loot. So if you playing in the party of 4, for example, and you got 4 keys to the vault, are 4 people can open the same vault and receive rewards.
Ominous Trials and Ominous Vaults
If you want a harder challenge and even better loot, ominous trial is the way to go. Essentially, it’s the same trial as the normal one, but with stronger, better equipped enemies and periodically dropped splash potions with various debuffs, which creates a significantly harder challenge for players.
Of course, you will be rewarded accordingly for completing the trial. The spawner will drop Ominous Key, which is a key used to open Ominous Vaults. The mechanics of how the key and vault work are the same, just that the amount of Ominous Vaults in the Trial Chamber is smaller and the loot in them is way more valuable.

To start this Ominous Trial you will need an Ominous Bottle — basically a potion that gives you Bad Omen effect(the same one that is used to summon raid on the village in the overworld). Ominous Bottle can be found in the Trial Chambers as a loot from the spawner upon clearing the wave of mobs, or can be dropped with a 100% from Raid Captain — a pillager that has a banner on it. Once the Bad Omen is in effect, simply walk near the Trial Spawner and it will transform into Ominous Spawner and trigger the desired Ominous Trial.

Mobs Inside Trial Chambers
Inside Trial Chambers you will face various hostile mobs like Zombies(and Baby Zombies), Slimes, Skeletons(or Bogged, variation of the default Skeleton that shoots poisonous arrows), Spiders and Cave Spiders. However, the main threat is a new mob called The Breeze.
The Breeze is a fast, wind-based mob that jumps around the room. It shoots wind charges that explode, dealing damage and knocking you high in the air. The knocking part is the biggest danger, as except for The Breezes, there will likely be many other mobs, and the Trial Chamber itself can have multiple floor to one room. So falling either from high place, or being knocked out right into the big group of mobs is a big danger to the player.
The Breeze deflects all arrows and projectiles. You must fight it with melee weapons. To get near The Breeze, block the wind charges with your shield, and make a run for it before the next attack.

How to Survive Trial Chambers
Here’s a few steps following which you will significantly increase you chances of successful Trial Chamber completion:
- Don’t Rush: Go through the dungeon room by room, as if you run through corridors you will likely activate multiple Trial Spawners, which will lead to more mobs at one time and a harder fight.
- Keep Moving: While in combat — move, especially during Ominous Trials. If you stay still, you are an easy target for ranged mobs, traps and splash potions during the Ominous Trial.
- Target Ranged Mobs First: Ranged mobs liek Skeleton and Bogged will be a big problem, constantly chipping away at your HP during your fight with the other mobs. So if there are multiple mobs, always target the ranged ones first.
- Use the Terrain / Room Layout: Unlike player, mobs cannot build. And there are no mobs that destroy blocks in the Trial Chamber too, so using the layout of the room, the terrain around together with building skills will be crucial to survive the trial.
Loot and Rewards: Is It Worth It?
Nonnegotiable, the rewards are absolutely worth the effort. Dungeon provides lots of useful survival resources like iron, emeralds, enchanted book, and different gear. However beyond that, dungeon has unique rewards that can be proved to be very useful otherwise:
- Heavy Core: Found only in Ominous Vaults, the main reason most player go the Trial Chambers. Combined with a Breeze Rod, Heavy Core is used to craft one of the newest weapons in the game - Mace. It’s a very unique and powerful weapon that is 100% forth the effort of obtaining.
- Breeze Rods and Wind Charges: Just like mentioned in the paragraph above, breeze rods are used to craft the Mace, and hence are a quite useful item. Wind Charges can be used for improved movement, as they launch you into the air at will. Both items obtainable form The Breezes.
- Armor Trims and Pottery Shards: While slightly less useful in general, Trial Chambers have unique cosmetic items that might interest collectors or builders.

Solo VS Multiplayer Trial Chambers
When it comes to playing solo VS multiplayer, it all comes down to the individual preferences. Playing solo is more challenging, it’s a real test of endurance and skill, however you keep all the loot you find.
Playing multiplayer on the other hand, despite the automatic difficulty scale(the more players in the party, the more mobs will spawn), is a bit easier, good teamwork is a great thing! The loot is shared, but that’s hardly the problem, as everyone gets to open the vaults as long as you get the keys. So playing in multiplayer is not significantly worse or better compared to the solo trial, it’s just a bit different experience. With that said multiplayer option is also perfect for an SMP server event!
If the idea with an SMP seems intriguing, make sure to check out our hosting service!
Common Mistakes to Avoid
Here’s a quick list of the common mistakes you should definitely avoid to ensure successful trial completion:
- Going in undergeared: unless you have most of the items from the list earlier, you will have a hard time at the Trial Chamber.
- Forgetting food: food is essential, it’s the main source of healing.
- Attacking the Breeze with ranged weapons: like we discussed earlier, this mob is immune to ranged attacks, so the only way to defeat it is in the close up battle.
- Wasting keys: do not throw aways keys. Even thought they are only used to open vaults, you might want to hold on to them in case you go to another Trial Chamber or return to the initial one and find the vault you’ve missed earlier.
- Not marking your steps: layout of Trial Chambers resembles that of a maze, so make sure to mark where you’ve already been and where you came from, to ensure a quick and safe return.
- Triggering Ominous Trials too early: it’s understandable you’d want a better loot and a mace as soon as possible, but do not jump the gun here, as the Ominous Trial is far more difficult than the normal one.








 en | USD
 CHAT WITH GODLIKE TEAM